
Karl F Newman
Master Cabinetmaker
7/26/2026
A very coarse set of course outlines for medieval-like hand tool woodworking: Some sections are more detailed than others depending upon how much time I took to write them and on how much demonstration is needed to understand them. I hope we all have fun.
Karl F. Newman
Aka THL Kai SaerPren
Ars longa, Vita brevis
Well directed curiosity is a blessing beyond price, to be encouraged always in oneself and in others now and forever? Ernestine Gilbreth Carey
Measure twice, cut once
Why are you measuring? (P. Follansbee)
Classes For Pennsic
- A Very Very Brief History of Woodworking tools
- A Toolbox full of tools. All of the tools you need to make anything!
- Ax and Hatchet use and Safety.
- Using a drawknife
- Set up and Using Wood Handplanes and Spokeshaves
- Care and Uses of Saws
- Chisels, Gouges and Joinery
- Brace and bits? A very boring subject.
- Work holding methods
- Sharpening all the Tools!
INTRODUCTION
Greetings and salutations! I am THL Kai SaerPren, please call me “K”.
I am not here to teach medieval woodworking because no one really knows what that is or what that means. There has been a lot of research in recent years to learn more about how things were made. Previous research focused on the made items to the near exclusion of HOW they were made. So our knowledge has been expanding in that area, but much of it is “experimental”, as in, let’s try to do this thing that they did with the tools we know they had and make the tool marks look the same. Much of their results are being put to use by the modern trend toward what is called “Green Woodworking”.
Green Woodworking is just woodworking. But instead of starting with sawn and kiln dried wood, you start with a log instead. Fresh cut logs are called “green” because they are full of water/sap and the cambium layer is still green in color. A lot of people mistake this for meaning that the woodworking is “green” as in the term used for “sustainable”. Many things that are called “sustainable” are also called “green” because they are good for the environment.
What I will be teaching is modern “green” woodworking “best practices”. Since most medieval woodworking was done straight from the log many of the same techniques are used so it is not impractical to think of this as “medieval like” woodworking.
We will start with a chunk of a log, split it up into slabs and blocks, smooth and trim it, and make a joint that would be typical of many medieval furniture pieces. You will have an opportunity to see and use the tools that this is done with as we go along. In our Two Half Days there is not enough time to actually make something complete so in order to have you all get a little “hands on” we won’t even try that. I’ll throw in some carving if there is time at the end of the second day.
Let’s have fun, make shavings, and be safe.
- A VERY VERY BRIEF HISTORY OF WOODWORKING TOOLS.
Stones, rocks, cutters and scrapers and abraders.
Stone axes and adzes. The Egyptian stone adze… first hand plane
Bronze tools; ax/adze combo tools, bronze saws in ancient Egypt. Sharpening bronze tools vs Steel tools.
The Iron tool revolution!!
Double bladed plane iron from Pompeii.
Steel improves the saw! And every other cutting edge in the tool box.
Laminated chisels and plane irons.
Loss and Reintroduction of the double plane iron in Europe.
The Rise of the Machines (industrial revolution).
Some comparison of Modern tools and “Period” tools.
2) A BOX FULL OF TOOLS.
ALL OF THE TOOLS YOU NEED TO MAKE ANYTHING!
Rule/Tape measure (or story board)
Saws; back , crosscut, coping. Or Frame, and Fret
Square; a big one and a small one (Make them yourself)
A chisel, 1 to 2 inches wide
A chisel, ¼ to 5/16” wide for mortices
16 oz. hammer
Mallet or Mordello
Knife
Compas/Divider
Marking gauge (make it yourself)
Screwdrivers, one w/ replaceable tips
Pliers
Nippers
Block Plane
Smooth or a Try Plane (9” or 14”)
½ round Rasp
Flat wood rasp
2 grit sharpening Stone
Adjustable Bevel ( make it!)
Brace and Bits to make holes (maybe a gimlet or burning iron for small holes) (cordless drill and drill bit set)
Ax, hatchet and froe maybe
Add tools as you want or need them, they can be old or new.
3) Ax and Hatchet use and Safety
May include details about Adzes, Froes, wedges and gluts
Axes, Adzes, Hatchets and Froes have been around for as long as humans have been shaping wood to suit our needs.
An Ax (also spelled axe) or hatchet has a cutting edge parallel to the haft (handle or helve). An Adze has its cutting edge oriented 90 degrees to the haft.
A Froe is a splitting tool that is placed on the wood where we want a split and then is struck with a mallet or club of wood driving it in. it is then levered on its handle to propagate the split. (While comparatively “safe” froes can be heavy… don’t drop it on your foot).
Improper and incautious use of these tools has, for as long as these implements have existed, occasionally resulted in the loss of fingers and toes, maybe a foot or hand. And sometimes even results in death.
Therefore it is imperative that each and every person who undertakes to use these tools understands that they are inherently dangerous. Only then can you hope to exercise the due caution that is required to help prevent such accidents.
Since I cannot be with you to supervise your every move after this class I will have to insist that I cannot be held responsible for any injury you might cause yourself, and likewise the SCA Inc. also has no liability if you should happen to injure or kill yourself. Your safety is your responsibility. Not mine.
I can only give you pointers to help you understand where the danger lies. And to help you avoid said danger.
The SAFEST thing to do is to never ever pick up an ax or be anywhere around one. And that is my first bit of advice on safety. Right here and now I am advising you to never pick up an ax and try to use it.
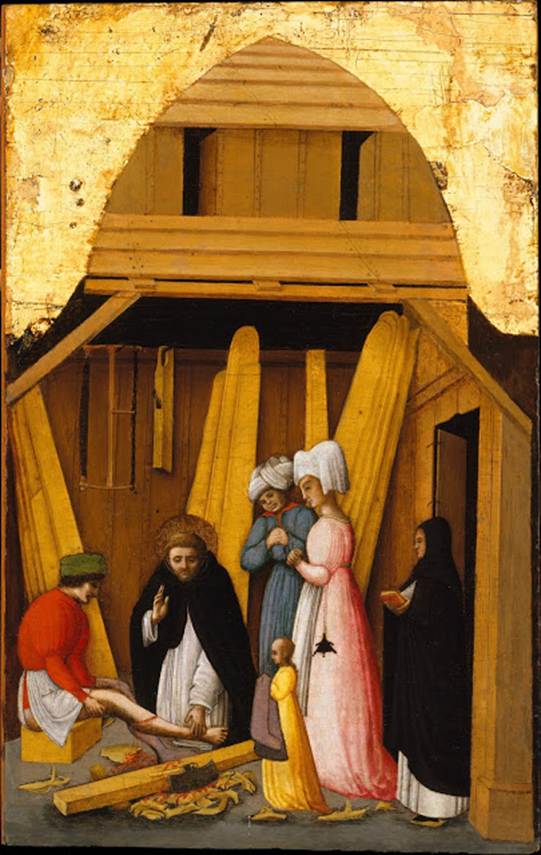
image and text found on the St Thomas Guild blog: “Sometimes you encounter a little gem when looking in books or browsing through the internet. This happened a week ago when I found a painting of Saint Peter Martyr Healing the leg of a young man at the digital images of the Metropolitan Museum of Art. The painting of tempera and gold on a wooden panel is Italian and made by Antonio Vivarini around 1450. The painting belongs to a set of 8 panel all set around Saint Peter Martyr (1205-1252). Antonio Vivarini had his workshop in Venice. This particular scene depicts Saint Peter Martyr miraculously healing a young man who, remorseful at having kicked his mother, had cut off his leg. The scene, however, is set at a carpenters workshop and more likely depicts a carpenter who has hit himself with a (single bevel) broad axe in his leg while squaring the log. “
For those of you who refuse to take that advice we can move on to more traditional rules for those who must use an ax. (Ax and Hatchet will be used interchangeably since a small ax is virtually a hatchet)
Read: Alex W. Bealer’s “Old Ways of Working Wood” the section on felling trees, he says it better than I do.
Make sure your work area is free of debris and obstructions. This is especially important when working in the woods. Before commencing, gently move the ax around its path to make sure it will not snag on any branches or saplings. But this also applies to inside your shop space. Make sure at home there is nothing that will get accidently hit (like your car).
Make sure that you have secure footing. Slipping at the last moment while you are swinging the ax can result in an injury.
Make sure there is no-one or nothing valuable in the arc of travel. Remember, the “Arc” that I am referring to starts at you, encompasses everything starting from you, and a line going out from yourself trough the ax at its starting point and continuing out as far as you could throw the ax. And it ends at a line going out from the axes stopping point. Why such a big area? Because ax heads sometimes fly off their handles!
Make sure that there are no dogs/pets or small children running around. You may think it is OK but then suddenly there they are between your ax that is already moving fast and the tree. (or their fingers or nose suddenly right on where you are concentrating)
Like knives, make sure that the cutting is never heading twords yourself.
(Show how it is unsafe to split small stuff by moving your hand at the last minute) show safe ways of splitting small stuff. Show froes and froe knives.
Demonstrate hewing a shape and a stick to put on a lathe.
Repeat “Keep your fingers out of the way!!!”
Never hit the back/poll of the ax with metal, No Hammers or sledges! They will bend the cheeks of the ax. If you have to hit your ax, Use a wooden maul or club.
Lots of small cuts make the work go well and safely. Trying to POWER thru with only a few cuts usually results in something getting damaged. Trying to “power through” with a dull ax will get you hurt!
When felling a tree, try to think of your motion somewhat as throwing the ax head into the tree. Likewise when using a hatchet swing or rotate the hatchet into the wood. Don’t try to straight pound it into the wood.
A sharp tool is safer than a dull tool! An ax that is dull enough to bounce off from a tree is still sharp enough to remove a finger or a toe!
(Illustrate making a proper felling notch.)
So your tree is down. Now what? Limbing and bucking are the next two steps. Limbing is taking your ax and removing the limbs. Bucking is crosscutting to manageable sizes. You can use your ax for bucking but a large felling or crosscut saw is usually preferable.
After Bucking you have sections of logs that are frequently referred to as “butts” (or billets or bolts, billet makes me think of a bundle of sticks and bolt makes me think of cloth but the words are used by some folks to mean the same as I mean when I say butt. A Butt is a section of a log cut to a length that will be usable or is useful to you. Next you will need to split or rive your butts into “bolts” or “blanks”. Splitting logs or butts is done with wedges, gluts and maybe a splitting ax. Mauls, Beetles and Sledges may be used. (refer to demo splitting a butt)
Stand the butt on end if it isn’t too long, and if the end is square enough (if you bucked your log with an ax your ends will not allow this). Examine the end looking for any cracks that may have already started. Some cracks start almost as soon as the tree is cut. These cracks usually radiate from the tree’s center (pith) and indicate a plane of weakness in the wood that we are going to exploit. Since you do not want this crack in your finished pieces, we will split the log on the crack! Take your froe or an ax and score a mark all the way across the log-end in a straight line. Take your Iron wedges and drive them in on the line with your sledge. Then (if needed) use the gluts to finish the split. Rive in halves to keep the splits running straight.
When it is small enough you can switch to the froe for splitting.
(have a “butt” and split it!)
After rough sizing go to your hackingstock and using your handaxe (hatchet) trim off any pith, bark, or sapwood that you do not want. Always keeping in mind what size part you want to end up with.
The MORE work you do now with the axes, the Less you do later with the drawknife.
Sharpening your Ax;
Most axes are tempered to a range such that a good medium cut (or medium bastard cut) metal file can be used to sharpen them. Most are beveled on both sides. Some are beveled on only one side. Only file on the bevels, if you are using an ax that is flat on one side, (beveled on the other) Never file on the flat side!
File all hewing and felling axes so that they have @ a 25 degree angle between the faces (bevels). (bevel = bezal = face)
File a splitting ax at a 40 to 45 degree angle.
Grind a froe to a 35 to 40 degree splitting angle. A froe is generally harder than an ax because of the twisting and bending forces that it must resist.
Adzes are sharpened at an angle similar to a hewing ax but with a bevel inside only. Additionally, the back (outside) curve of the adze needs to be along the swing line of the adze. (see diagram) if these conditions are not met the adze will dig in too deeply or bounce off. Bouncing is exceedingly dangerous. The adze eye, enabling the adze head to be removed from its haft, is an arrangement for making sharpening easier. The adze is usually made from steel that is harder than an ax head so a file will not be able to sharpen it. You will need a grinder and a honing or sharpening stone.
Large/long handled adzes are sometimes referred to as foot adzes. the safest action is to make the cutting under (or between) your foot (feet). Sounds quite hazardous but trying to use it else wise is more likely to result in an injury to your ankle or foot.
Stand upon /on top of your work such that your “handed” (right handed? right foot) foot is forward. Aim your stroke such that the cut will start just in front of your toe and ends under the ball of your foot.
DO NOT HURRY! Rushing your work while using ax or adze can result in injuries.
Be calm, Be steady, Be deliberate. Steady pace wins the race.
4) Drawknives, Spokeshaves and the Shaving horse
Tools you will need are:
Drawknife
spokeshave
Schnitzelbank
I just like saying schnitzelbank. But some sort of Shaving Horse or other stock holding device is required. Dumbhead, zugstok. What you call yours is not very important. You can do this work in a face vice on a workbench.
bib and brace,
The Drawknife is one of those tools that is more dangerous when you aren’t using it. It can lurk down in the dark depths of your tool box waiting for an incautious finger. So first safety rule is to cover/wrap it in something to both prevent cuts and prevent other steel tools from damaging it. A leather sheath is good, wrapping it in oiled or waxed newspaper held in place with a rubber band also works well.
A drawknife is usually sharpened at a steeper angle, @ 30 to 35 degrees is usually good. I have used them with shallower angles, one I bought that was a nice “French” design had a 45 degree angle that wouldn’t cut, it was sharp but the angle was too steep.
The Stock or Workpiece must be held securely which is where the shaving horse comes in. The advantages of the shaving horse over a work bench vice become apparent once you see the rapidity with which you can shift the position of the stock. This is not to say that working from a workbench vice is by any means inferior just a bit slower when moving the stock around.
(prep a piece for planing here)
Sitting at the horse, you will notice that as you pull with either tool you brace against the foot rest thus clamping tightly on your workpiece. Notice how the drawknife dives and rises as you adjust your angle. Notice also how you can follow the grain of your workpiece.
Set the blade of a large spoke shave so that it takes a thick shaving on one side and a thin one on the other side. This way you can adjust what type of cut you make by the position of the tool.
On smaller spokeshaves you will want to set to make the very shallowest cut possible.
For shaving horse plans you can do a quick internet search and you can e-mail me for a sketch-up file of ideas.
5) How to use a wood bodied hand plane
(and modern iron planes)
The planes:
Jointer, Fore, Try, Smooth, Block, Scrub and Molding.
Sub sets of molding Planes: hollows, rounds, fillister, sash fillister, rebate.
Forkstaff and Rounder plane, Widjit.
Scratch stock
Description of the Anatomy of the plane: Sole, Toe, Heal, Mouth, Throat, Tote, Wedge, Cap Iron, Iron
Set the cap iron. Why it’s adjustment and fit are critical.
Seat the Irons in the plane body.
Set the wedge.
Adjust the lateral alignment.
Adjust the depth of cut.
Brace stock firmly on… wherever you have to work.
Brace your stance.
Use the Plane!
You cannot replace skill with technology. You CAN make the bulk work easier and get to the skilled part faster.
Holding methods for planing:
hold fasts, planing stop, roman vise,
6) CARE and USE of SAWS
Saws are like hammers… Everyone is certain they know how to use one. And nearly everyone is wrong!
Our Tools are an extension of our bodies.
Saws have changed over the centuries only as much as the metals will allow. Handles and the methods of attaching them are mostly a matter of fashion, thus handles have changed more than any other aspect of a saw. I suspect this is due to the fact that the wood itself does not change. The saw’s blade only changes according to the quality of its metal. Each improvement in the metal available has seen an adjustment in the geometry of the points.
It may be interesting to try for a day to cut wood with an Egyptian bronze saw. And if you really want to get into the feel for early medieval wood working you could try using a saw made of iron. I believe that you will quickly understand why most work was still done from riven or hewn stock. Likewise, why sawn boards weren’t popular before sawmills. Timberframes or cruck houses needed no sawn timbers. (I will point out that pitsaws are a late Roman innovation. They took another 500 years before starting to “catch on”.
However, saws are very handy for making the joints in timbers. Many of the period depictions of saws show them being used on large timbers.
Saws are divided into two styles according to tooth shape, and two styles according to handle type.
Tooth Types:
Crosscut teeth are angled and filed to cut across the grain of the wood. Cutting to length. Thus, they are filed to a shape like knives, first one tooth cutting on the one side and then the next tooth cutting on the other.
Ripsaw (or rip/ripping) teeth are made to cut with the grain, cutting to width. Thus, they are filed like a row of chisels.
A crosscut blade will cut very poorly in a rip direction and a rip blade will stick and tear in a crosscut direction.
Both types of teeth are also “set”, that is every other tooth is bent right then left, etc. Set on a tooth makes a kerf (slot made by the saws action) that is just a bit wider than the saws blade is thick. This reduces friction to an acceptable level.
The handle types:
The grip handled saw is the saw that is most frequently found here in the USA. Also called a panel saw because of the wide steel panel that makes up the blade. Also in this group are the slotting saw, back saw, gents saw, miter saw, and luthiers fretsaw.
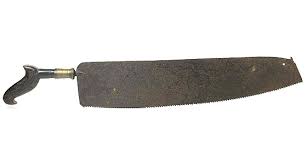
The frame saw (frequently called a “continental” saw by the English) consist of a thin narrow blade tensioned inside of a light but strong frame. The blade can either be centered in the frame or at one side. This group includes; continental, fellow or felley saw, turning, coping, hack and many others. (and a fret saw for fretwork)
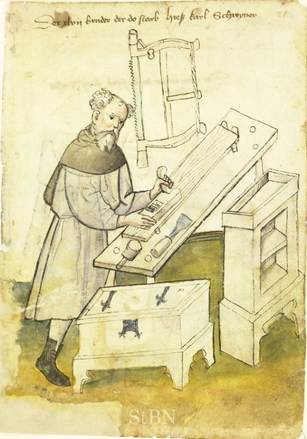
If you get to know and like your saws well, I advise you to take the time to learn to sharpen them yourself. Sorry, not covered in this class.
So, how to proceed?
Grip your handle firmly, but NOT a “death grip”. Make sure your wrist is straight. Line up your saw tip, wrist, elbow and shoulder. These need to be all in the plane of the cut you intend to make. Take easy strokes, keeping all in alignment. Let the saw do the work, don’t push down. When it feels right, like you are not fighting it, it will work.
Now the secret X-ray vision technique!
Ring a crosscut blade and a rip blade, hear the difference.
Between uses and anytime your saw gets wet or damp, clean it and wax it. Floor wax or turtle wax for cars works wonders. A little bit of wax on the blade also makes the cuts go faster. Many people used to use tallow or lard, but they can be hydroscopic.
Please don’t ever cut fiberglass with any saw you intend to use again. AND don’t lend a saw to someone who just needs to take 2″ off their pultruded fiberglass spear.
7) Chisels, Gouges and JOINERY
So very much has been written on the use of tools for joinery (the joining of wood parts by making joints) that I think that I will just cover some pointers. Once you get used to the tools you will find that you can make any joint you desire.
Marking joint lines with a knife and cutting a valley for the saw start.
Making the joint “perfect” on the outside and Relieving the rest.
Mark and cut always from the faces. Let the backs fall where they may.
Demonstrate Paring across and down.
Make a Mortice and Tennon joint.
8) Brace and Bits.
Difference between boring and drilling… (there’s a joke here somewhere).
Boring is when the material at the bottom the hole is CUT away.
Drilling is when the material at the bottom of the hole is pulverized or ground out.
So Augers and Twist drills are boring, and Rock drills are drilling.
brace styles: wood, Spofford, ratchet, penny, etc
bit styles: Auger, spoon, shell, twist
where to get spoon bits new:
Fred Emhoff
Veritas tools
Dave Budd handmade tools at: http://davebuddknives.homestead.com/Tools-for-the-Craftsman.html
9) Work Holding Methods
Shaving horse
Holdfast
Planing Stop
Holdfast with the Bird’s mouth
Pegs and Wedges
Notch in the edge of a Workbench
Bowl carving horse and sabot maker’s horse.
Bowl carver’s throne?
Dogs
10) Sharpen all the Tools
Sharpening is one of my pet peeves. Once upon a time sharpening was seen as an easy and everyday chore needed to keep the work going smoothly.
Then one day some bright son of the soil decides he’s going to “invent” something to make sharpening “easier”. This invention may have actually made sharpening easier, but, in order to convince people to buy it they went and tried to convince everyone that sharpening the “old way” was difficult and took up too much time.
And that is what annoys me! To this very day most folks are convinced that sharpening is hard and complicated extremely time consuming and wasted effort and all sorts of negative things! Even! At the beginning of the last century many shops tried to get their workers to sharpen their tools at home in the evening! (this didn’t last, but it was tried)
Sharpening is easy. The angles are not precise so holding a tool by hand and getting it “about right” is sufficient. Making everything super-uber-duper-scary-sharp is NOT necessary! Sharp enough to shave with will suffice most of the time. And you can achieve “sharp enough to shave with” with a cheap 2-sided AL Ox stone that you can get from your local hardware store.
$100, 8000 grit Japanese water stone? Waste of time and money. Maybe a soft Arkansas stone for when you want a better edge.
I used to work for a guy who would brag about spending 2 hours/chisel to get them super razor sharp. (he usually trotted this out when he saw me spend 2 minutes touching up an edge) and I asked him one day “why”? and he went on and on about what amazing things he could do with a chisel that sharp. So, I asked him how often did he need to do those amazing things? See the answer is NEVER! I pointed out to him that he never uses his chisels because it takes him so long to sharpen them. And on the rare occasion he does use them he ends up abusing them and chipping the edges because he ground them too shallow. Whereas, I use mine every day. And touch them up a little whenever they need it. And never spend more than 10 minutes to get to a razor sharp edge that is good enough to get the work done.
So: Axes want a bevel angle about 30 degrees. Axes can usually be sharpened with a file, for a better edge then use the fine side of your hardware store stone and touch with a strop. You CAN cut straight off the file.
Chisels and plane irons usually want a bevel angle 25 to 30 degrees and are harder than axes so they need to be ground (not dropped, use a grinder). Then hone on the fine side of the stone to remove the grinder marks and a bit of stropping, you are good to go.
Saw sharpening is a skill that you should develop, but it is sufficiently complex that I am not going to undertake to outline it here. Use a superfine file.
Most drill/auger bits are sharpened with a file. There is a file made specially for them.
Sharpening a card scraper is simple, file square across, hone square across, and then use the burnisher to extrude a burr.
For more information about: me, these topics and others, visit my website!
Biblio:
- Michael Dunbar, “Restoring, Tuning & Using Classic Woodworking Tools”
- Alex W. Bealer, “Old Ways of Working Wood”
- Bernard E Jones, “The Complete Woodworker” & “The Practical Woodworker”
- Paul N Hasluck, “The Handyman’s Book”
- Joseph Moxon, “Mechanick Exercises or the Doctrine of Handy –Works”
- Bruce Hoadley, “Understanding Wood”
- Randle Holme’s “The Academy of Armory, or, A Storehouse of Armory and Blazon”
- Roy Underhill, “The Woodwright’s Shop” & etc.
And if you can find copies that you can read. (let alone understand ;P)
- André Jacob Roubo, “L’Art du Menuisier “
- Denis Diderot, “Encyclopédie”
Handy web pages:
http://yesteryearstools.com/Yesteryears%20Tools/Axe%20Nomenclature%20Plus.html
http://pfollansbee.wordpress.com/
https://groups.yahoo.com/neo/groups/medievalsawdust/conversations/messages
http://thomasguild.blogspot.nl/
http://www.lutesociety.org/pages/building-lute-original-methods
http://lumberjocks.com/Lazy_K/blog/
http://acsoltlada.hu/index.html
wkfinetools.com
For older northern European work benches
https://hyvelbenk.wordpress.com
ADDENDA:
Shaving horses:
The number of designs or styles of shaving horses almost equals the number people who have made shaving horses.
Search google and you’ll find too many to choose from. Mostly they are a matter of what you first got used to. I have met people that use a bench vise and got so used to it that when they tried using a shaving horse they didn’t like it. Sometimes you have to go with what works for you.
If you need Ideas; e-mail me and I’ll send you a SketchUp file with a dozen ideas in it.
One of the earliest illustrations of a shaving horse is in “de rei Metallica”.
Workbenches:
You will all have noticed that my bench at Pennsic is a crude slab of wood, barely surfaced, thrown down on crude legs. A quick search of the Google will reveal a plethora of workbenches and workbench plans with a range of sophistication to meet anyone’s aesthetics.
My intent with my slab bench is to demonstrate that a sophisticated bench is not necessary to get started. Some 2x’s on horses can get you started. And getting you started is what I am all about!
If you read Moxon, Roubo, and Fabian you find details of the finest benches that they knew of. If you review the website { https://hyvelbenk.wordpress.com } you will see many workbenches that are not much more than narrow slabs on legs (sort of like mine but with better legs, sometimes).
A workbench requires a stiff top and legs that do not flex. If your bench top deflects (bounces) when you pound or mortice upon it you are wasting energy making the bench bounce. If your top is stiff enough all of your effort goes into your work and not into “bouncing” your bench. Legs that are too flimsy will make your bench wiggle, sway, and walk across the floor when you plane, again wasting your energy. So, all you need is a stiff top and strong legs.
My top is stiff enough. But you will probably have noticed that my legs need to be better, since my field bench sways when we plane upon it…. (update I made better legs in 2016)
So, “what’s the best workbench”? Well, that depends. (I hate saying that! But not enough to not say it)
Start with something inexpensive. Stack of pre-used 2 x 4’s, an old flat door, something on sawhorses. After you get to making things you will get a feel for what you want to do and how you want to do it. Then make a bench that suits you and what you are doing.
E-mail me for a sketch up file of ideas.
On Grease Pots:
Often neglected in instructions about woodworking is the topic of lubrication. But evidence suggests that it was so common a practice that everyone had some sort of a container to contain some sort of “grease” to put on tools when they felt they were dragging.
I used to work with a Master from Portugal who always said “a little wax never hurt anything”.
So, I encourage you to do a little research into grease pots to hold the stuff (see wkfinetools.com), and then you can decide what you want to put in it.
You can just use a block of paraffin or a block of beeswax.
Historically; lard, tallow, suet, butter and beeswax were all used alone or combined to use to make the tools slip and slide better. When a lard or tallow was too soft, a bit of Lye could be added to make it harder (yes, that makes it a soap or partly soap, you can use a bar of ivory soap if you want to).
Conversely if you have a tool or tool handle that slips in your hand, wiping on a thin smear of pine tar can put a stop to that.
I use a 50/50 mix of beeswax and mineral oil (food grade) that is commonly called tool butter (by people who put it on their tools) or spoon butter (by people who put the same thing on their finished wooden spoons). I make it up in a jury rigged double boiler and pour it into my “grease pot”.
Tools you can (should) make Yourself:
- Marking gauges
- Scratch stocks
- Large Compass
- Squares
- Adjustable bevel(s)
- Hand Plane(s)
- Spoke shave (Dave’s shaves, Hock, Veritas or another supplier)
- Go-Devils
- Center finder
- Maul/Froe club
- Gluts
- Shaving horse
- Workbench
- Brace
- Saw frame
- Grease pot(s)
Ars longa, Vita brevis
art is long, life is short, first attribution is to Hippocrates. Reused/paraphrased by St Francis of Assisi, Chaucer, and Gustav Stickley. The life so short, the craft so long
Leave a Reply